In the tab of the administration screen you will find the current settings of the TANlock. You can make changes here.
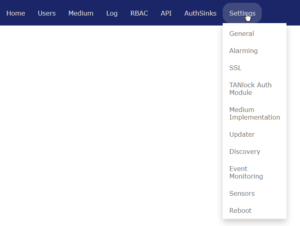
The following tabs are available in the tab:
- Home
- User
- Medium
- Log
- RBAC
- API
- AuthSinks
- Settings
Save changed settings on the TANlock by clicking on “Save”.
You can refresh the display of the settings by clicking on “Refresh”.
- “Home“
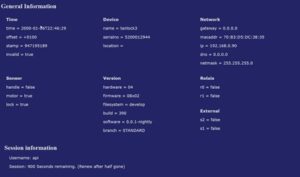
The Home tab displays the following information:
-
- Time:
Time indicates the current time and date.
- Device:
Under Device is the product name and the corresponding serial number of the TANlock.
- Network:
Under Network you will find the following information: IP address, netmask and mac address.
- Sensor:
The internal sensor system indicates the following states: TANlock open or closed, lever turned.
- Version:
Information about the firmware.
External connection of up to two signal transmitters possible: False= inactive and true= active.
Connection of two door contacts possible.
Logged in user and expiration of the session after 900 seconds (After that new login necessary).
2. “Settings“
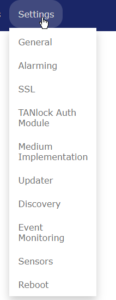
In der Karteikarte “Network” stehen folgende Felder zur Verfügung:
- General: Allgemeine Einstellungen:
- „Set Time“: Entweder manuelle Eingabe von Zeit und Datum oder Synchronisation mit dem Browser.
- „Alive indication“: In dem ausgewähltem Intervall (Standard 300 Sekunden) wird ein Funktionstest der LEDs anhand eines Lauflichts signalisiert.
- „Set VLAN“: Aktivierung eines VLAN möglich.
- „Set Network“: Konfiguration der manuellen IP-Umgebung oder Aktivierung von DHCP möglich.
- „Set NTP“: Manuelle Eintragung eines Zeitservers möglich.
- „Service-Mode“: TANlock wird in die Auslieferungsstellung versetzt (Einstellungen werden nicht zurück gesetzt!).
- Alarming:
- „Set Used DoorContacts“: Aktivieren und Deaktivieren der Türkontakte
- „Set DOTL Time“: Einstellen des Voralarms (PreDotlTime) und des Hauptalarms (DotlTime)
- SSL: einfügen von Zertifikaten
- TANlock Auth Module:
- „Set TANlock Authentication Module“: Auswählen des entsprechenden TAMs (TANlock Authentifizierungsmodul)
- „Set TANlock Device Type“: Auswahl:
- TANlock
- Security Drawer (Sicherheits Schublade)
- Medium Implementations:
Aktivierung und Deaktivierung der zur Auswhl stehenden Medien.
- Updater:
Bei Interesse wenden Sie sich bitte an Ihren Ansprechpartner bei FATH Mechatronics.
- Discovery:
-
- „Set Discovery“: Konfigurierbarer Anmeldevorgang des TANlocks an ein Fremdsystem.
- „Monitoring-Events“: Logging sämtlicher Events am TANlock.
- HTTP: Ein HTTP-Event wird an eine URL gesendet.
- Syslog: Ein Syslog-Event wird an Zieladresse gesendet.
- SNMP-Trap: Ein Event-Trap wird an Zieladresse gesendet.
- Event-Monitoring:
- HTTP: Monitoring über HTTP-Events
- SysLog: Monitoring über SysLog-Events
- SNMP: Monitoring über SNMP-Events
Aktivierung, Deaktivierung und Einstellung von optionalen Sensoren (Derzeit vorhandene Sensoren: Temperatur und Luftfeuchte).
Neustart des TANlocks.
Karteikarte “AuthSinks“:
- „LDAP“:Einrichtung der LDAP-Konfiguration (Siehe Templates).
Karteikarte API:
- „SNMP“: Aktivierung und Einsellung der SNMP-Befehle.
- „MIB“: Beschreibung der SNMP-Befehle zum Download für Integrierung in Monitoring Software.
- „SNMP-Version“: Version v1, v2c oder v3 möglich.
- „Community-Settings“: Benennung der Benutzergruppe.
- „Rest“=Restful, standardmäßig aktiviert.
- „Web“: standardmäßig aktiviert.
Karteikarte “RBAC”
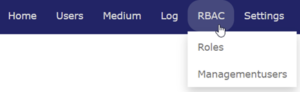
In der Karteikarte “RBAC” stehen folgende Felder zur Verfügung:
Hier befinden sich die vordefiniterten Rollen mit ihren Berechtigungen. Über den Button „Add Roles“ können neue Rollen mit ihren ausgewählten Berechtigungen erstellt werden.
Hier können Managementuser mit den unterschiedlichen Rollen angelegt und verwaltet werden.
Karteikarte “Log”
In der Karteikarte “Log” werden alle Events am TANlock getrackt.
Karteikarte “Users”
Hier werden berechtigte Benutzer über den Button „Add User“ angelegt, welche den TANlock bedienen dürfen. Dieser kann hier ebenfalls deaktiviert oder gelöscht werden.
Karteikarte “Medium”
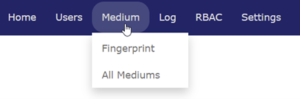
In der Karteikarte “Medium” stehen folgende Felder zur Verfügung:
-
- Fingerprint: Hier werden Fingerprints den Usern angelegt, zugeordnet oder gelöscht werden. Es können maximal 32 Fingerprints hinterlegt werden.
- All Mediums: Hier werden die unter „Settings à Medium Implementations“ aktivierten Medien den Usern zugeordnet