Instructions

Here you will find the instructions for the initial startup of the TANlock with the current software version:

1. Connect your computer to the network

a) Open Network and Sharing Center

b) “Connections: Open Ethernet

c) open “Properties

d) click on version 4 (TCP/ IPv4) and open properties

e) Click on “Use the following IP address

IP address: 192.168.0.30

Subnetmask: 255.255.255.0

f) click “ok” and close all windows

The default settings of the TANlock are:

DHCP disabled / fixed IP: http://192.168.0.90, Subnetmask: 255.255.255.0
VLAN disabled,

2. connection of the TANlock via a web browser

a) Open the web browser (e.g. Google Chrome)

b) Enter the IP address http://192.168.0.90 in the address line

c) Log in with name “api” and password “lab” and then click the “Login” button.

Each TAM has RFID as its base. Further options such as PIN are superimposed on the RFID.

1.1 Select Device Type

  1. “Settings -> TANlock Auth Module -> Set TANlock Device Type
  2. Select TANlock or security drawer
  3. Activate TAM:
    “Settings” -> “TANlock Auth Module” -> “Set TANlock Authentication Module”.
  4. Select the desired TAM
  5. Confirm with “set
  6. Reboot under “Settings”-> “reboot

1.2 Activate medium

  1. “Settings” -> “Medium Implementation
  2. Activate desired medium type
  3. Reboot under “Settings”-> “reboot

1.3 Create User

  1. Open the “User” tab
  2. “Add User”
  3. Fill in data fields and confirm with “add”
  4. User is created

1.4 Assign medium to a user

  • “Medium”-> “All Mediums
  • Select “Add new identification path” for the corresponding user.
  • Select the corresponding medium type

PIN

  1. Under “identifyer”, enter the desired pin code consisting of the numbers 1 to 4.
  2. Confirm with “set


RFID

  1. Hold RFID card in front of TAM
  2. Open the “log” tab
  3. Copy the entire code within the quotation marks
  4. Open the tab “Medium”-> “All Mediums” ->”Add new identification path” and select the appropriate user
  5. Paste the copied code under “identifier
  6. Confirm with “add


FINGERPRINT

  1. “Medium”-> “Fingerprint
  2. Select “Add Fingerprint” for the selected user.
  3. The red LED on the TAM flashes
  4. Place the corresponding finger on the scanner until the red LED lights up and the blue LED flashes, then lift the finger.
  5. Place finger again until blue LED lights up and yellow LED flashes, then lift finger
  6. Place finger on scanner again until yellow LED lights up and TANlock opens

A maximum of two fingers can be stored per user.

In the tab of the administration screen you will find the current settings of the TANlock. You can make changes here.

The following tabs are available in the tab:

  • Home
  • User
  • Medium
  • Log
  • RBAC
  • API
  • AuthSinks
  • Settings

Save changed settings on the TANlock by clicking on “Save”.
You can refresh the settings display by clicking on “Refresh”.


  1.   Tab “Home“

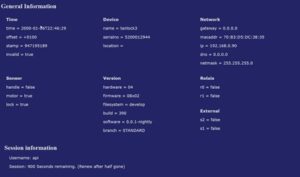
The Home tab displays the following information:

    • Time:

      Time displays the current time as well as the date.

    • Device:

      Under Device is the product name and the corresponding serial number of the TANlock.

    • Network:

      Under Network you will find the following information: IP address, netmask and mac address.

    • Sensor:

      The internal sensor system indicates the following states: TANlock open or closed, lever turned.

    • Version:

Firmware Information.

    • Relais:

External connection of up to two signal transmitters possible: False= inactive and true= active.

    • External:

Connection of two door contacts possible.

    • Session information:

Logged in user and expiration of the session after 900 seconds (After that new login necessary).
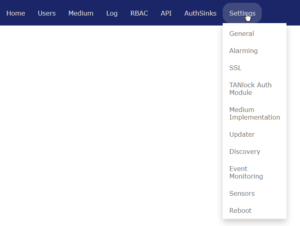
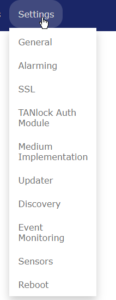
2. Tab “Settings“

The following fields are available in the “Network” tab:

  • General: General settings:
    1. „Set Time“: Either manual input of time and date or synchronization with the browser.
    2. „Alive indication“: In the selected interval (default 300 seconds) a function test of the LEDs is signaled by a running light.
    3. „Set VLAN“: Aktivierung eines VLAN möglich.
    4. „Set Network“: Configuration of manual IP environment or activation of DHCP possible.
    5. „Set NTP“: Manual entry of a time server possible.
    6. „Service-Mode“: TANlock is set to the delivery position (settings are not reset!).
  • Alarming:
    1. „Set Used DoorvContacts“: Activating and deactivating the door contacts
    2. „Set DOTL Time“: Setting the pre-alarm (PreDotlTime) and the main alarm (DotlTime)
  • SSL: einfügen von Zertifikaten
  • TANlock Auth Module:

  1. “Set TANlock Authentication Module”: Select the corresponding TAM (TANlock authentication module).
  2. “Set TANlock Device Type”: Selection:
      • TANlock
      • Security Drawer
  • Medium Implementations:

Activation and deactivation of the available media.

  • Updater:

    If you are interested, please contact your FATH Mechatronics representative.

  • Discovery:
    1. “Set Discovery”: Configurable login process of the TANlock to a third-party system.
    2. “Monitoring events”: Logging of all events on the TANlock.
      1. HTTP: An HTTP event is sent to a URL.
      2. Syslog: A syslog event is sent to destination address.
      3. SNMP-Trap: An event trap is sent to destination address.
  • Event-Monitoring:
    • HTTP: Monitoring of HTTP-Events
    • SysLog: Monitoring of SysLog-Events
    • SNMP: Monitoring of SNMP-Events
  • Sensors:

Activation, deactivation and setting of optional sensors (Currently available sensors: temperature and humidity).

  • Reboot:

Restart of the TANlock.

Tab “AuthSinks“:  

  • “LDAP”:LDAP configuration setup (See Templates).

Tab “API”:

  1. „SNMP“: Activation and setting of SNMP commands.
    1. „MIB“: Description of SNMP commands to download for integration into monitoring software.
    2. „SNMP-Version“: Version v1, v2c or v3 possible.
    3. „Community-Settings“: Naming the user group.
    4. „Rest“=Restful, enabled by default.
    5. „Web“: enabled by default.

Tab “RBAC”

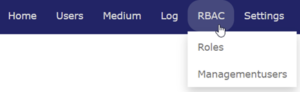
The following fields are available in the “RBAC” tab:

    • Roles:

Here are the predefined roles with their permissions. The “Add Roles” button can be used to create new roles with their selected permissions.

    • Managementusers:

Management users with different roles can be created and managed here.

Tab “Log”

All events on the TANlock are tracked in the “Log” tab.

Tab “Users”

Authorized users who are allowed to operate the TANlock are created here via the “Add User” button. This can also be deactivated or deleted here.

Karteikarte “Medium”

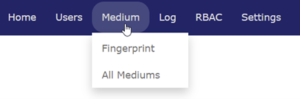
The following fields are available in the “Medium” tab:

    • Fingerprint: Here fingerprints can be created, assigned or deleted for the users. A maximum of 32 fingerprints can be stored.
    • All Mediums: Here the media activated under “Settings à Medium Implementations” are assigned to the users

In this case, please contact Oliver Jasorka at oliver.jasorka@fath-mechatronics.de or +49 91757909-154.